As you may know, accessing the Azure Virtual Desktop HTML5 client using its non-memorable public endpoint address (https://rdweb.wvd.microsoft.com/arm/webclient/index.html) can be a hassle. However, were you aware that there exists a method to utilize your personal custom domain name for accessing the service?
Back in 2020, Tom Hickling, Senior PM for Azure Virtual Desktop at Microsoft, blogged about a complex method that involves using a combination of Azure tools and services, such as Azure Front Door, to achieve this. While this approach offers the benefit of a memorable and custom domain name, it can be time-consuming and comes with additional costs.
Here are some pros and cons:
Pros:
- Resolve Azure Virtual Desktop service using a memorable and custom domain name.
Cons:
- Too complex to implement.
- Somehow time-consuming.
- Involves additional cost, in case Azure Front Door is preferred.
But what if I told you there’s an easier and more cost-effective solution?
Introducing Azure Static Apps
With this service, you can quickly and easily deploy a static website that redirects to another website, in our case that would be the Azure Virtual Desktop HTML5 client. In general, Azure Static Web Apps is a service that automatically builds and deploys full-stack web apps to Azure from a code repository.
Here’s how the AVD HTTP redirection works:
- The client queries the custom domain name avd.markou.me.
- The DNS request is resolved and the CNAME record is returned to the client.
- The client connects to the Azure Static Website.
- Azure Static Web App redirects the client to AVD public endpoint address.

The following HTTP code does the trick. A very simple HTTP redirection is configured
<!DOCTYPE html>
<html>
<head>
  <meta http-equiv="refresh" content="0; url='https://client.wvd.microsoft.com/arm/webclient/index.html'">
</head>
<body>
  <p> You are being transferred to Azure Virtual Desktop Service<a href="https://client.wvd.microsoft.com/arm/webclient/index.html"></a>.</p>
</body>
</html>
Prerequisites
Before deploying the Azure Static Web App, make sure you complete the following steps:
- Create a GitHub account (if you don’t have one already).
- Import/clone the public GitHub repository george-markou/avdurlredirect into a new one GitHub Repo. Attention, do not fork, I repeat, do not fork 😀
- Optional, create a Personal Access Token (PAT) to automate the provisioning of the Azure Static Web App.
Deploy Azure Static Web App
Once you’ve completed the prerequisites, it’s time to deploy the Azure Static Website:
- Navigate to Azure Marketplace, search for Static Web App, and create a new one.
- Fill in the required parameters, such as name, plan type, region, and source (GitHub).
- Authenticate using your GitHub account.
- Choose the newly imported repository from the drop-down menu.
- After the deployment is complete, navigate to the newly created Static Web App.
- On the overview blade, choose “Edit workflow”.
- Click on the edit button to edit the workflow yaml file within your repository.
- Change the parameter in line 30 to “/src” instead of “/”.
- Hit “Start commit”. After a few seconds, a GitHub Action will be triggered, pushing the code to the newly created Static Web App.
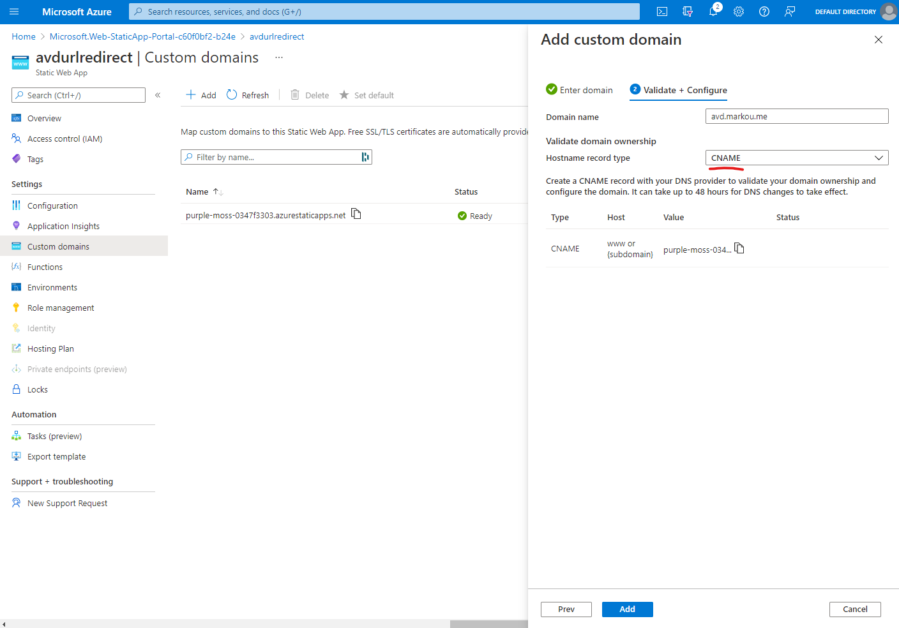
- Return to the Azure Portal, choose “Custom domain” from the resource menu, and click on “Add” to configure your custom domain.
- Add the required CNAME record on your public dns zone, pointing to the hostname of the newly deployed Azure Static Web App.
- Verify that the DNS record has been configured correctly.

Verify that the DNS record has been configured properly.

In conclusion, this solution offers a streamlined and cost-effective way to enhance your experience when accessing Azure Virtual Desktop using a custom domain name. While the traditional method involving Azure Front Door can be complex, time-consuming, and incur additional costs, the introduction of Azure Static Apps presents a more straightforward alternative.
Forgot to mention, give it a whirl 👉 https://avd.markou.me.
Let me know what you think or how can this module can become better in the comments down below.
Thanks for reading my blog!


You must be logged in to post a comment.