PowerShell Desired State Configuration is what we call a configuration management framework which allows us to configure Windows or Linux Infrastructure using configuration as a code. It is using the push/pull method to keep our systems configuration “aligned” and prevent “drift”. People often confuse it with Group Policy, well its pretty similar but both of them are needed and each one of them individually serves its own purpose of existence.
Which are the Key DSC Components?
- DSC Resources
- DSC Configuration
- Local Configuration Manager (LCM)
- Pull Server
- Pull Clients
Which are the software/system requirements?
- WMF 4.0 or greater.
- Microsoft Desktop OS: Windows 7 or greater.
- Microsoft Server OS: Windows Server 2008 R2 or greater.
- CentOS 5, 6, and 7 (x86/x64)
- Debian GNU/Linux 6, 7 and 8 (x86/x64)
- Oracle Linux 5, 6 and 7 (x86/x64)
- Red Hat Enterprise Linux Server 5, 6 and 7 (x86/x64)
- SUSE Linux Enterprise Server 10, 11 and 12 (x86/x64)
- Ubuntu Server 12.04 LTS, 14.04 LTS and 16.04 LTS (x86/x64)
Below, you will find a quick but briefly guide on how to apply basic configuration on servers by ensuring that specific roles & features are present(installed) using the push mode. Guess which role I’ve chosen? Telnet of course! Sounds silly but 90 percent of the environments I am dealing with on a daily basis, are missing this feature.
Before we start making things happen, let’s find out the exact name of our feature we need. Open an elevated PowerShell prompt and execute the following one-liner.
Get-WindowsFeature | Out-GridView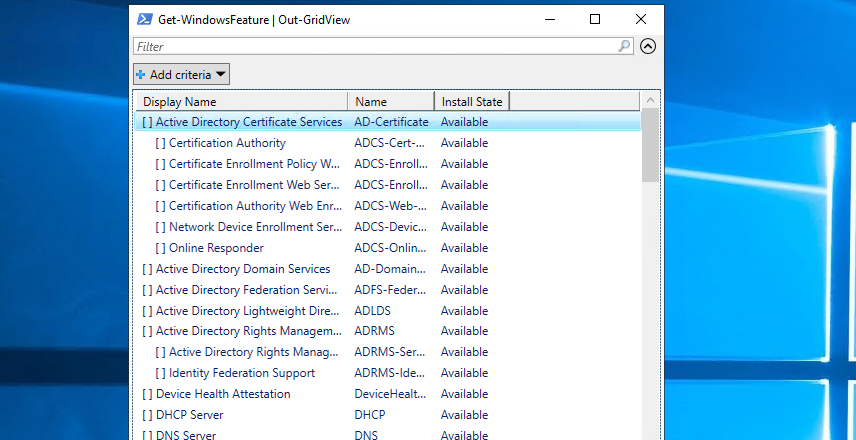
Make a note of the feature name.
Now, open an elevated PowerShell ISE Instance and start building your configuration block by block as described below.
First, the Configuration name, in line:1 I’ve set the name to “Install-TelnetClient” because I wanted to give a very short but briefly name of what this configuration does.
Configuration Install-TelnetClient
{Second, the nodes block is were we set the audience, modules, parameters and configuration. Leave this part as it is.
param
    (
        [string[]]$ComputerName='localhost'
    )
    Import-DscResource –ModuleName 'PSDesiredStateConfiguration'
    Node $ComputerName
{Third, within the node block we declare what kind of configuration needs to be executed and maintained on the servers. In this example, I needed to ensure that Telnet Client is present on our Servers and if not then make sure that it will be installed 🙂
#Install Windows Roles & Features
        WindowsFeature Telnet-Client
        {
            Ensure = "Present"
            Name = "Telnet-Client"
        }
     }
}Four, the closure part. This is where I make sure that the resulted MOF files will end up in a specific folder of my system (under c:\DSC\Servers). Last but most important, using parameter -ComputerName I get to choose the remote systems that my configuration will be applied.
mkdir -Path C:\DSC\Servers\Install-TelnetClient;
Install-TelnetClient -ComputerName 'Hostname01','Hostname02' -Outputpath C:\DSC\Servers\Install-TelnetClient;
Lets put all the blocks together.
Configuration Install-TelnetClient
{
param
    (
        [string[]]$ComputerName='localhost'
    )
    Import-DscResource –ModuleName 'PSDesiredStateConfiguration'
    Node $ComputerName
    {
        #Install Windows Roles & Features
        WindowsFeature Telnet-Client
        {
            Ensure = "Present"
            Name = "Telnet-Client"
        }
     }
  }
  mkdir -Path C:\DSC\Servers\Install-TelnetClient;
  Install-TelnetClient -ComputerName 'Hostname01','Hostname02' -Outputpath C:\DSC\Servers\Install-TelnetClient;
Hit F5 and execute the configuration. Examine carefully the output and notice that one MOF file has been created for every server we defined within the configuration.

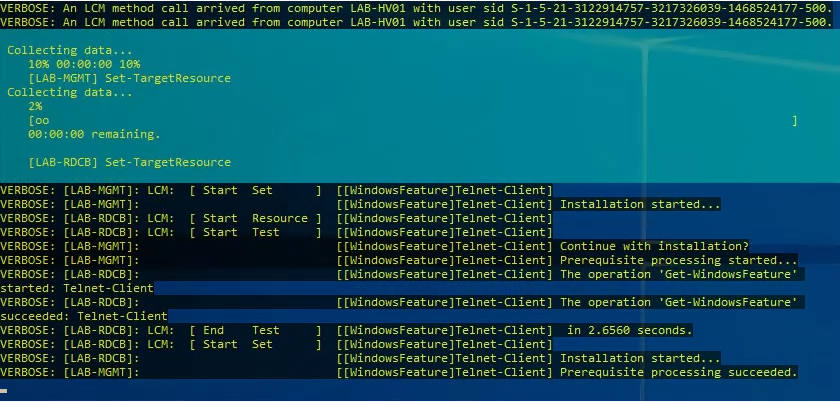
Now our configuration it’s ready to be consumed by our servers! Let’s push it! Execute the following PowerShell one-liner and adjust it according to your configuration/proper paths. Most important, always use an elevated account with the appropriate permissions on the servers.
Start-DscConfiguration -Path "C:\DSC\Servers\Install-TelnetClient\" -Wait -VerboseAnd then the magic happens!

Last but most important step, testing the applied configuration.
Test-DscConfiguration -ComputerName "Hostname01", "Hostname02", "Hostname03" -Detailed
Thanks for reading!
You must be logged in to post a comment.