I am very excited to announce that Nested Virtualization is now possible with AMD processors! I mean it’s here, but still not GA. We are getting there!
At the moment you are reading this, do not try to enable Nested Virtualization for your Virtual Machines. As this is a preview release of Nested Virtualization on AMD, there are some limitations and requirements to keep in mind if you want to try this out.
- Currently supported on Windows 10 Hyper-V.
- Ensure that your OS Build is 19636 or greater. To get this build you need to opt-in for Windows Insider program.
- The Hyper-V Feature Role installed.
- AMD Processor, first-generation Ryzen/Epyc or newer that support AMD Virtualization (AMD-V) technology.
- Virtual Machine with version 9.3.
Once you have in place and installed the required Windows 10 OS build, if you query the available VM configuration versions, you will find out that the new VM version 9.3 is listed.
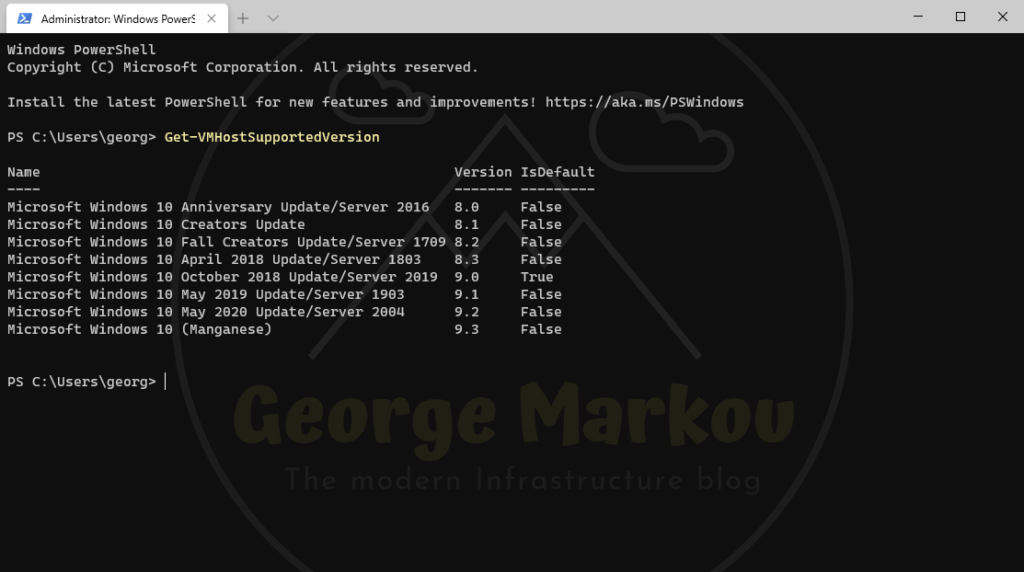
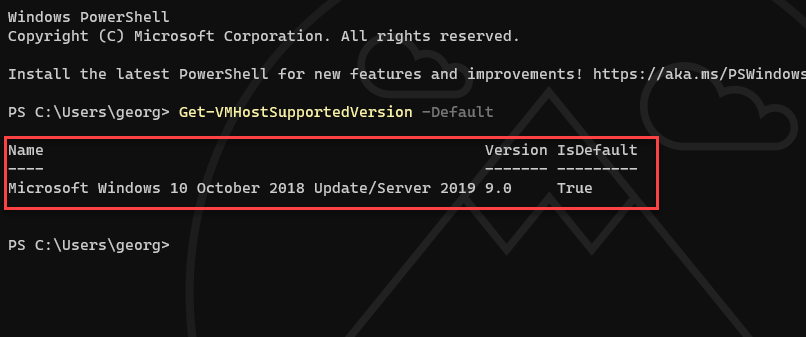
But, if you query the default VM version, you will then find out that 9.3 is not the one.
So what should you do?
Scenario 1: Enable nested virtualization for an existing VM.
If you try the obvious like to update the VM version using Update-VMVersion cmdlet, you won’t go anywhere beyond version 9.0. Why? Because version 9.0 is the default one.
Unfortunately, you’ll have to go through the following checklist:
- Delete the existing VM but retain the disks.
- Create a new VM at version 9.3 using PowerShell.
- Configure the required resources(processor, memory, disk, network interfaces).
- Enable nested virtualization.
- Finally re-attach the existing disks.
In case you want to use PowerShell to quickly carry out the tasks above, feel free to use the following one-liners.
### Remove Virtual Machine from Inventory ###
Remove-VM -VMName ”NameOfTheVM”

### Create a new VM with configuration version 9.3, Generation 2 and Startup memory of your preference ###
New-Vm -VMName ”NameOfTheVM” -Version 9.3 -Generation 2 -MemoryStartupBytes 8192MB

### Set the number of Processors ###
Set-VMProcessor ”NameOfTheVM” -Count 4

### Attach the Virtual Hard Disk ###
Add-VMHardDiskDrive -VMName ”NameOfTheVM” -Path "D:\pathtodisk\NameOfTheVM.vhdx"

### Enable Nested Virtualization ###
Set-VMProcessor -VMName “NameOfTheVM” -ExposeVirtualizationExtensions $true
Scenario 2: Enable nested virtualization for a new VM.
That is very straightforward if you just go through the following checklist:
- Create a new VM at version 9.3 using PowerShell.
- Configure the required resources (processor, memory, disk, network interfaces).
- Enable nested virtualization.
Thanks for reading my blog!
Feel free to drop your comment or question below.
[…] Go to Source of this post Author Of this post: George Markou Title Of post: Nested Virtualization with AMD Processors Author Link: {authorlink} […]