Azure Arc empowers you to extend Azure management and services to any infrastructure. One powerful way to leverage Azure Arc is by automating script execution on Azure Arc-enabled servers. In this guide, we’ll walk through using Bicep templates in conjunction with Azure DevOps Pipelines to achieve this automation seamlessly.
Prerequisites
Before we begin, ensure the following:
- Azure Subscription RBAC: Contributor access to an active Azure subscription where the Arc-enabled servers reside.
- Azure DevOps Project: A project established in Azure DevOps with necessary permissions and a Git Repo (Optional).
- Azure DevOps Service Connection: An Azure service connection to the subscription or resource group scoped for the deployment.
- An Azure Storage Account: A container storage intended for housing the scripts. Now depending on your environment requirements and restrictions, this could be either a private Container (accessible using a SAS Token, need to add it in the code) or a Blob Container.
Scenario
Our primary goal is to automate the execution of a PowerShell script on an Arc-enabled Windows Server, which will create an empty text file within the C:\Temp directory. To achieve this, we are going to use a mix of IaC with Bicep and Azure DevOps Build Pipelines.
Step 1: Authoring the Bicep Template
For our scenario, we’ll create a Bicep file (main.bicep) outlining the resources and integrating the required script execution logic. The following code utilizes the machine extension custom script, deploying a PowerShell script stored within an Azure Container Storage to the chosen Arc-enabled server. Additionally, we’ve chosen to parameterize specific deployment values, allowing for runtime customization and, naturally, increased reusability. Once you’ve finished creating the template, store it in your Git Repository.
param arcMachineName string
param storageAccountName string
param storageContainerName string
param scriptFileName string

resource extension 'Microsoft.HybridCompute/machines/extensions@2022-12-27' = {
  name: '${arcMachineName}/customScriptExtension'
  location: resourceGroup().location
  properties: {
    publisher: 'Microsoft.Compute'
    type: 'CustomScriptExtension'
    typeHandlerVersion: '1.10'
    autoUpgradeMinorVersion: true
    settings: {
      fileUris: [
        'https://${storageAccountName}.blob.core.windows.net/${storageContainerName}/${scriptFileName}'
      ]
      commandToExecute: 'powershell -ExecutionPolicy Unrestricted -File ${scriptFileName}'
    }
  }
}
Step 2: Creating the Build Pipeline
The YAML file below outlines the structure and logic of our Build Pipeline. Essentially, it comprises three stages: code linting, deployment validation, and finally, the deployment of resources utilizing the previously crafted Bicep Template. The included Pipeline parameters enable the provision of distinct deployment values during execution. Notably, the pipeline isn’t set to trigger automatically nor is it scheduled for regular execution.
trigger: none
parameters:
- name: arcMachineName
displayName: Azure Arc Machine Name
type: string
default: ''
- name: storageAccountName
displayName: Storage Account Name
type: string
default: ''
- name: storageContainerName
displayName: Storage Account Container Name
type: string
default: ''
- name: scriptFileName
displayName: Script File Name
type: string
default: ''
- name: azureResourceManagerConnection
displayName: Service Connection Name
type: string
default: ''
- name: subscriptionId
displayName: Subscription Id
type: string
default: ''
- name: resourceGroupName
displayName: Resource Group Name
type: string
default: ''
- name: location
displayName: Deployment Location
type: string
default: ''
pool:
vmImage: ubuntu-latest
stages:
- stage: Lint
jobs:
- job: Lint
steps:
- script: |
az bicep build --file main.bicep
- stage: Validate
jobs:
- job: Validate
steps:
- task: AzureResourceManagerTemplateDeployment@3
inputs:
connectedServiceName: ${{ parameters.azureResourceManagerConnection}}
location: ${{ parameters.location}}
deploymentMode: Validation
resourceGroupName: ${{ parameters.resourceGroupName}}
csmFile: main.bicep
overrideParameters: -arcMachineName ${{ parameters.arcMachineName}} -storageAccountName ${{ parameters.storageAccountName}} -storageContainerName ${{ parameters.storageContainerName}} -scriptFileName ${{ parameters.scriptFileName}}
- stage: Deploy
jobs:
- job: Deploy
steps:
- task: AzureResourceManagerTemplateDeployment@3
inputs:
deploymentScope: 'Resource Group'
azureResourceManagerConnection: ${{ parameters.azureResourceManagerConnection}}
subscriptionId: ${{ parameters.subscriptionId}}
action: 'Create Or Update Resource Group'
resourceGroupName: ${{ parameters.resourceGroupName}}
location: ${{ parameters.location}}
templateLocation: 'Linked artifact'
csmFile: 'main.bicep'
deploymentMode: 'Incremental'
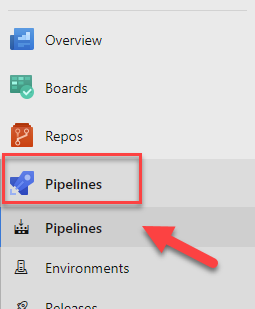
overrideParameters: -arcMachineName ${{ parameters.arcMachineName}} -storageAccountName ${{ parameters.storageAccountName}} -storageContainerName ${{ parameters.storageContainerName}} -scriptFileName ${{ parameters.scriptFileName}}To set up the necessary pipeline, start by accessing Azure DevOps and navigating to Pipelines.
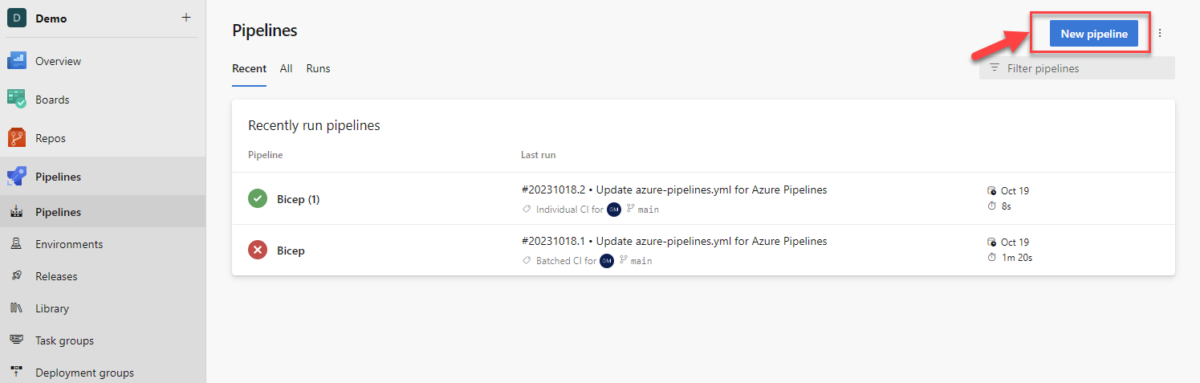
Once in the Pipelines section, click on ‘New Pipeline’ at the top right corner.
Select Azure Repos Git, choose your recently created Git repository, and then opt for the Starter Pipeline. Remove all the existing content in the Starter Pipeline and replace it with the provided snippet.
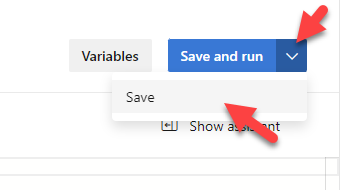
After pasting the snippet, click the dropdown arrow next to the ‘Save and run’ button and select “Save.”
If you opt for a different Git Repository outside of Azure DevOps, the steps outlined earlier might differ in their execution or interface layout.
Step 3 (Optional): Schedule the Pipeline to run using a schedule on a daily basis
To schedule the Pipeline to run for example on a daily basis, just add the following block underneath trigger:none.
schedules:
- cron: "0 0 * * *"
  displayName: DailyScheduledPipeline
  branches:
    include:
    - '*'
  always: true
Step 4: Running the Pipeline and verifying Script Deployment
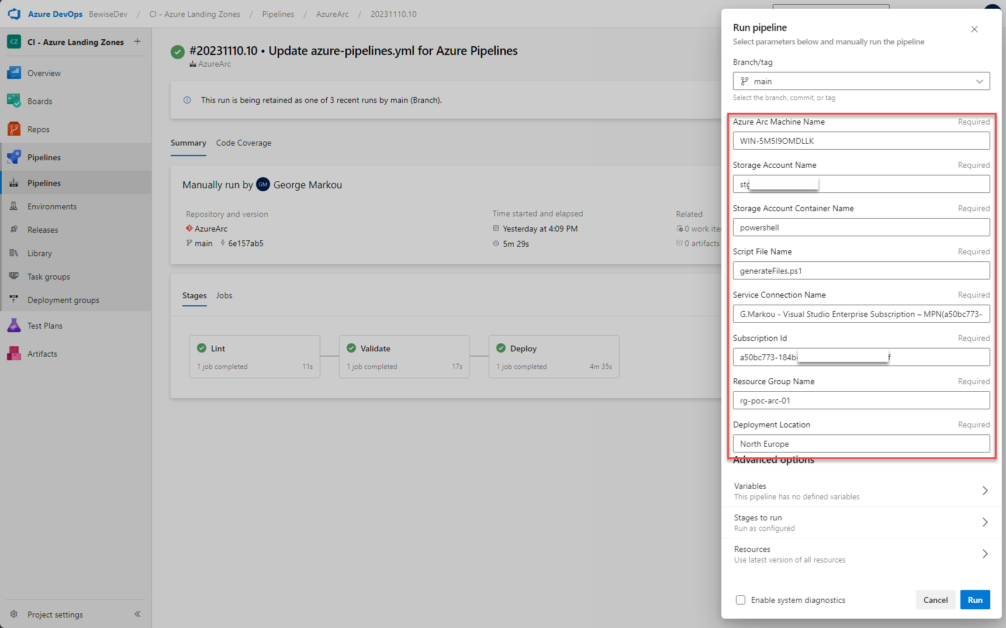
Navigate to the recently created build pipeline and select ‘Run Pipeline.’ You’ll be prompted for specific inputs. Once you’ve provided all the required information, click ‘Run’ to initiate the process.
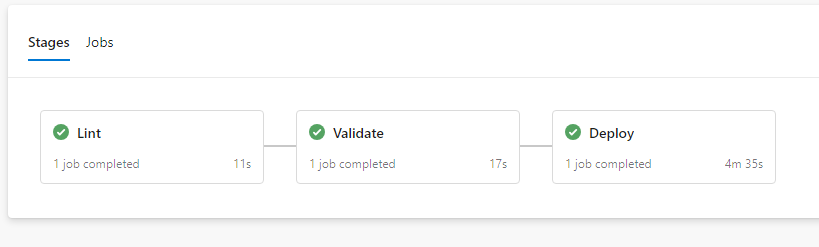
If the Pipeline succeeds, you will be presented with the following
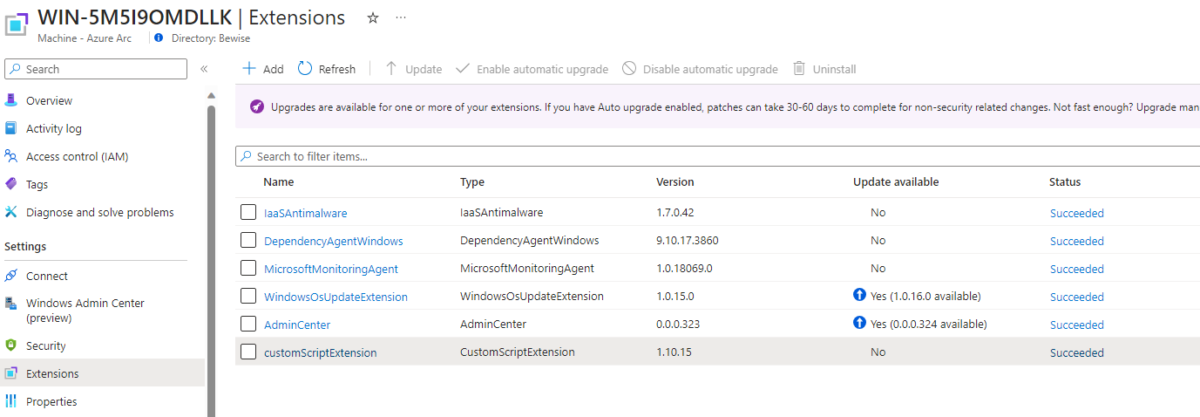
To visually confirm the successful execution of the script, go to the Azure Portal and access the Arc-enabled server extensions blade. Validate that the status of the ‘customScriptExtension’ is indicated as ‘Succeeded’.
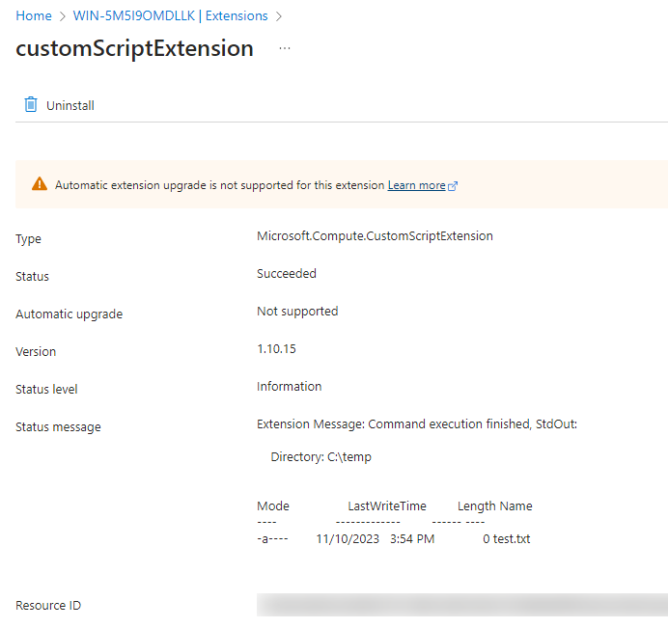
Finally, click on ‘customScriptExtension’ and examine the Status message.
That’s it! You’re now ready to automate script execution on Azure Arc-enabled VMs using Bicep and Azure DevOps.
In conclusion, leveraging Bicep and Azure DevOps empowers you to manage and automate Azure Arc resources effectively, streamlining your deployment processes.
Let me know what you think in the comments below.
Thanks for reading my blog!
You must be logged in to post a comment.