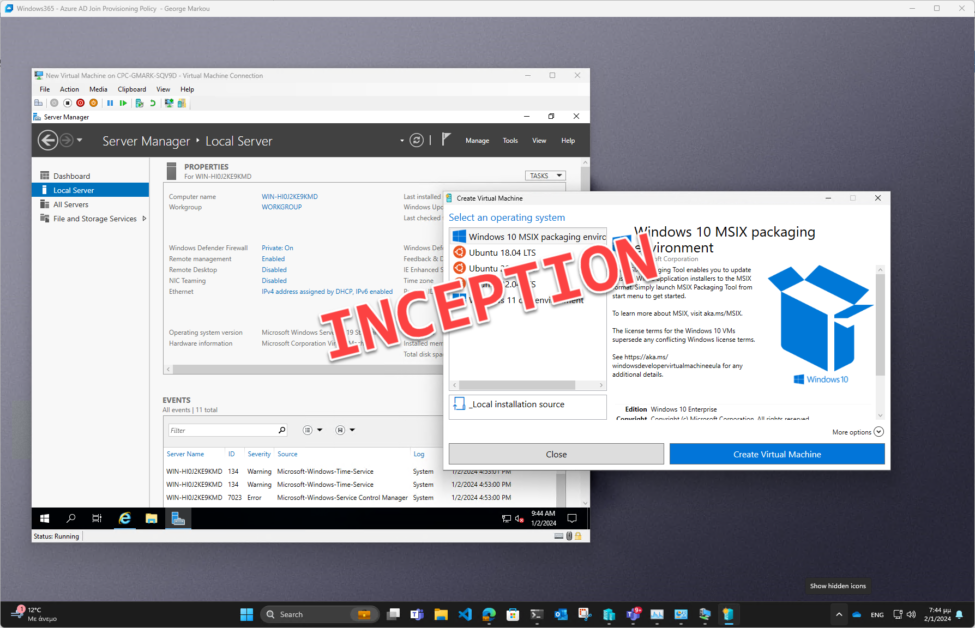
Running Hyper-V within Azure VMs has been an available option, though not usually recommended for production workloads, yet supported if that’s the path you choose. But when it comes to Windows 365 Cloud PCs, nested within the Azure ecosystem, the question emerges: Can we harness the capabilities of Hyper-V within these cloud-based workspaces? The answer might surprise some, but it’s a resounding yes.

Why should I bother enabling Hyper-V virtualization or hosting guest VMs on my Windows 365 Cloud PC?
In general, nested virtualization on Cloud PCs and Azure VMs unlocks a myriad of use cases, broadening possibilities across diverse scenarios. Here are some examples:
- Development Environments.
- Training and upskilling.
- Pentesting.
- Demos and Proof of Concepts.
- Testing, Testing, and Testing!
Other supported workloads beyond Virtualized Operating Systems
Running Virtualized Operating System instances is not the sole use case of virtualization-based workloads available for a Windows 365 Cloud PC. The following workloads are also supported:
- Windows Subsystem for Linux (WSL)
- Windows Subsystem for Android
- Sandbox
Enabling Hyper-V Virtualization on Windows 365 Cloud PC
Before getting started, ensure that your Cloud PC meets the following requirements:
- CPU Configuration: It requires a Cloup PC SKU with a minimum of 4vCPU. Downsizing to a 2vCPU Cloud PC will disable nested virtualization.
- Supported Regions: Provision your Cloud PC in one of the supported regions for Windows 365. Note that nested virtualization isn’t supported in Germany West Central and South Africa North.
- Performance Consideration: Some users might experience a performance decline on 4vCPU Cloud PCs due to inadequate Compute resources when using nested virtualization.
- GPU Cloud PCs: Nested virtualization is not supported on GPU Cloud PCs.
- Ensure you have administrative privileges on your Cloud PC to enable and manage Hyper-V.
Method 1: Traditional Approach – Enabling Hyper-V using GUI
- Go to Control Panel.
- Access Programs and Features.
- Select “Turn Windows Features on or off.
- Check the box next to Hyper-V and click “OK”.
- Reboot your system when prompted, and enjoy.

Method 2: Scripted Approach – Enabling Hyper-V using PowerShell
- Open an elevated PowerShell prompt.
- Enter the command: “Enable-WindowsOptionalFeature -Online -FeatureName Microsoft-Hyper-V-All“.
- Reboot your system when prompted, and enjoy.
And now what?
Congratulations! You’re now set to create and host Guest Virtual Machines on your Windows 365 Cloud PC! If you’re new to this or haven’t explored it yet, Hyper-V offers the Quick Create option. This feature provides vetted images from Microsoft, streamlining the deployment of Virtual Machines swiftly and effortlessly! Since your Cloud PC resides in the Cloud, the entire process— from downloading the image to deploying the Virtual Machine— takes less than 2 minutes!

Alternatively, you always have the option to create a Virtual Machine by spinning up a supported operating system image.
Conclusion
Nested Virtualization shares similarities with running Hyper-V on a physical machine, but it does come with certain limitations. It’s essential to stress that any workload deployed in this environment should be strictly designated for NON-PRODUCTION purposes.
Let’s delve into the virtual networking aspect. While default settings may not be the most exciting choice (I get it, hearing that might disrupt your flow), it’s advisable to stick with them. Enabling Hyper-V Virtualization on Windows creates a Default Hyper-V Virtual Switch, which operates internally. Therefore, it’s prudent to maintain this setup, allowing your Guest Virtual Machines to utilize an APIPA Network Address. This configuration enables seamless communication between the guest, host, and beyond, including access to the broader network like the Internet.
Additional Resources
- Nested Virtualization and Windows 365 Cloud PCs – Set up virtualization-based workloads on your Windows 365 Cloud PC. | Microsoft Learn
- Hyper-V Nested Virtualization – What is Nested Virtualization for Hyper-V? | Microsoft Learn
- Nested Virtualization and Azure Virtual Machines – Which Azure VM Sizes support Nested Virtualization? – George Markou
Bonus
Last but not least, feel free to try out my Azure Resource Manager Template which will automate the deployment of an Azure Virtual Machine, that is pre-configured with Hyper-V and nested virtualization.
Thanks for reading my blog!
Feel free to drop your comment or question below.


You must be logged in to post a comment.